
Bloom – tutorial by Ursula Jewelry.

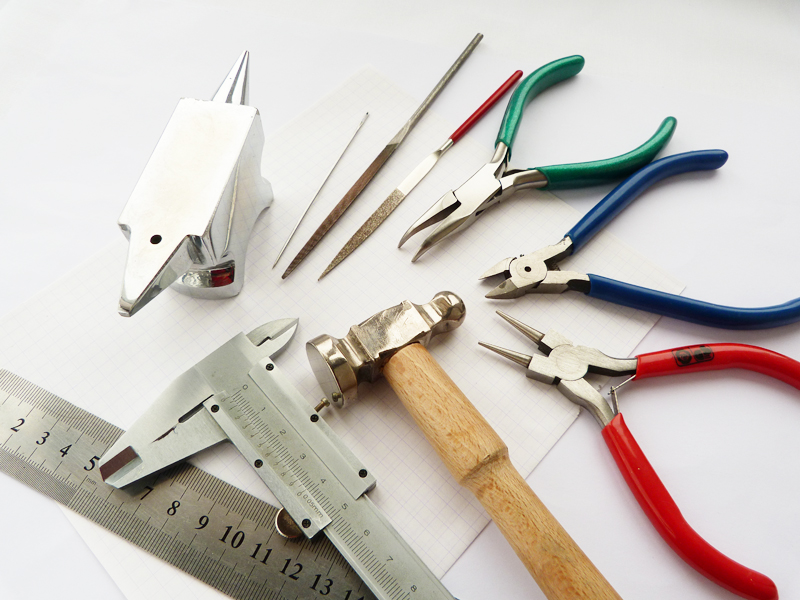
Instruments: round-nose pliers, needle
nose pliers, side cutters, needle-point file, hummer, anvil, 1300 degrees
Celsius burner, ruler, sand paper 02,
GOI polishing paste, engine oil, aqua ammonia, borate
of soda, engraver (not obligatory).
Protection: building gloves, rubber gloves, mask, gloves.
Materials: cooper 1.3 mm wire– 50 cm, cooper
0.8 mm wire– 50 cm, cooper 0.5 mm wire– 50 cm, cooper 0.4 mm wire– 50 cm,
cooper 0.4 mm wire– 1 m, beads, earring fixtures (cooper look).
1. Make sure that wire is not covered
with the lacquer, even if it is of cooper colour. Otherwise patina will not stick to the work piece later. How to check?
Wear gloves, protect your hands and arms! Carry the piece of wire through the
fire – if the smoke, flame
and unpleasant smell appear it
means there is some lacquer. Perfect.
Meanwhile the cooper becomes softer.

Carry the thin wire through the fire very fast, so it will not burn. Wire
becomes black. The rest oh the lacquer I take out with the sand paper. Or
sometimes I boil burned pieces in citric acid solution. After citric acid I
wash the wire in the water very carefully.


2. We have prepared the
materials, now we prepare the idea: draw the scratch. Most of my bijous are far from the primary
scratches, but it is better to save thoughts on the paper. Start bending
the thickest wire for the base. Do not be in a harry, work on each millimeter,
with the small steps. Do not forget sometimes to compare it with the scratch.


3. At the end we have to get
to details like this. For the second earring
we bend a wire in mirror reflection, but now orient on the first earring, not
on the scratch. Just turn over
the pro-forma and compare accurately.


4. Now you need to flatten the
pro-forma with the hummer on the beakiron. Not to disturb anyone I put the felt
pillow under the beakiron. Strike very carefully,
it’s better to strike three times lightly than one time but damaged. To strike such a detail rather difficult because the lines cross each other. I strike where I can
and then open the curve and strike each part individually, then close the curve
and straighten it with the hummer. I work only from the inner side. The
bijou would prettier if broad and narrow sections interchange each other
smoothly. It makes the composition more vivid.


5. Flatten pro-forms open a
little. Exam them carefully,
bend with the round-nose pliers, so they become identical. Now we need to polish
the ends and surface side in order to take away the instrument footprints.

6. Cut two pieces of 0.8 mm wire, 10 cm each. On the ends of these pieces
we need to do the droplets. We need gas burner and borate of soda. Borate of soda
makes the droplets smooth and greatly fastens the process. Bend the pro-forms, dip
the ends to the borate of soda powder and direct the flame steam from the
bottom upwards. Be attentive, the process takes only few seconds. It is important
to leave the neck of the droplet pretty but not very thin, otherwise it may
break. You cam boil readymade droplets in citric acid, to get rid of black
colour and work a little with the needle point file.

7. Now braid thin pro-forms to the thick ones with the help of 0.4 mm
wire. Form the pro-form according to the scratch. Leave the end of 15 cm on the
left side and start braiding the thick pro-form from the middle.


Join thin pro-form. I like to do it
in the following way: 4 curves on the thick wire, 2 on the thin. It is
better to direct curves straight and tight, but if it does not work out,
correct it with the bend pliers and needle.


Cut the end inside the construction, so it does not stick out to the
front side. Tight it slightly with the bend pliers curving.


8. Now come back to that end, which sticks out in the middle. With its
help we tie up the beads to the base. Form the curve on the thin wire for the
bead and tie up. Fasten off the end in the same way.

9. Make a pretty spiral from the sticking out end with the droplet with
the help of round-nose pliers. Braid the
second earring in the mirror reflection. Now we need to patinate these pro-forms
and two pieces of 05 mm wire, 15 cm ach.
About patinating in ammonia steams (aqueous
ammonia) I wrote in a
previous lesson.

10. Wait 1-2 hours till cooper becomes
dark. And now take out the pro-forms and start polishing. Do not forget about
gloves and other protection. Soften the polishing paste with engine oil, then rug with felt in necessary
places, which we want to make brighter. Finally polish with the engraver, felt wheel.
You can do it without this device, but it takes more time and energy. Wash the pro-form
with the brush and dishwashing liquid, which solvents fat.


11. Well done. But I add bead-flower with a eyehole in the middle. Tight
it with polished 0.5 mm wire. I think all my readers are really talented, and if
you do not find a bead in such a shape, you may make it by themselves or think
about another variant for decoration. Open
earring fixture, fix our earring. Ready! You may cover it with the lacquer, so
it will not become dark with the time. I leave it for your option.


Gorgeous earrings, Oksana!! Thank you so much for the wonderful, and very detailed tutorial!!
ReplyDeleteMay I ask you what kind of varnish, do you use, to cover your jewelry?
Thank you!
Verónica
Thank you, Veronica! :)
DeleteThis is a special varnish for metal Rustin's http://restavraciya.com.ua/tovars.php?tov=58
I'm just a link in Russian, unfortunately.
Oksana
This is sold on eBay and Amazon.
DeleteReally? :(
DeleteThank you! Your work is so beautiful!
ReplyDeleteThank you! :)
DeleteLove your work! Thanks for sharing!!!
ReplyDeleteThank you! :)
DeleteHi Oksana,
ReplyDeleteI have looked trough all your post now and I'm so impressed by your work!
I have a question about soldering and about making the small beads in the end of the wire, instead of using borate can i use the solution (flux) that is used on silver when soldering? Or is it something totally different? In what kind of store can i find borate? Best wishes Kim
Hello, Kim! :)
DeleteThank you! I am very glad to meet you!
Yes, you can use a flux. It is made just on the basis of borax powder.
Write me, if you'll questions - I'll try to help you.
Oksana
Great, thank you! I'm looking forward to learn this technique :)
DeleteHi Oksana,
ReplyDeleteSorry for bothering you again, I have so many quetsions.. Do you use respiratory protection while making the beads and when soldering copper? I want to be safe while working with it. Thanx again!
Yes, I use a mask. All metal vapors are harmful to our health. Take care of yourself! :)
Delete